The Gadgets Page

December 5, 2015

DoubleTime strap for Apple and Mechanical Watches

Filed under: Watches — Matthew Strebe @ 8:32 am

Full disclosure: The author of this article is the inventor of the strap.

The DoubleTime strap is the only watch strap in the world that lets you keep the classic look and functionality of your favorite watch and add all the useful wizardry of the Apple Watch. You no longer have to choose between the classic elegance of your traditional watch or the notifications and apps you’re addicted to from your Apple Watch. With the DoubleTime, you can just have both all the time.

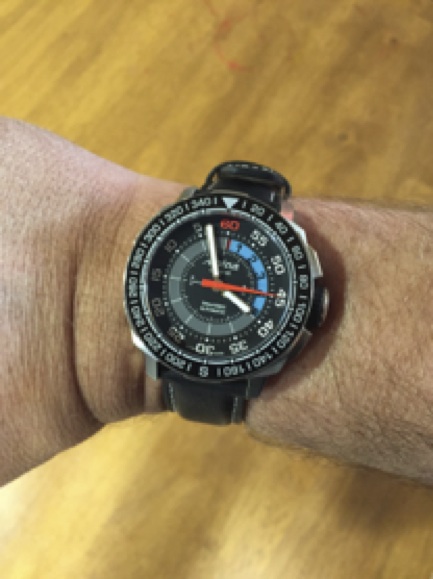
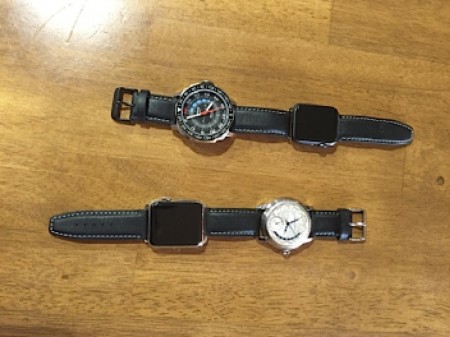
Double Time Front View from The Gadgets Page

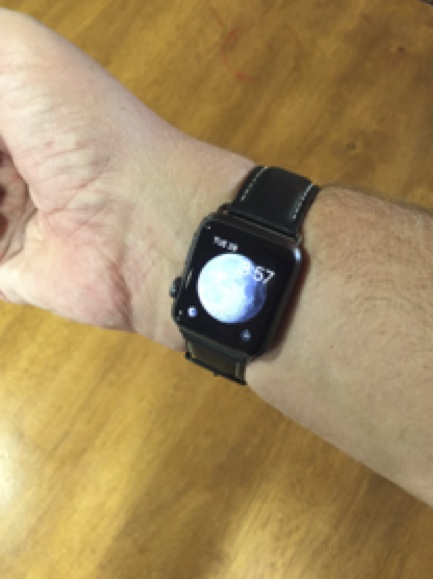
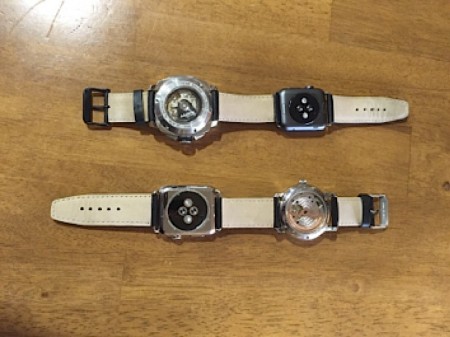
In the photos above and below, you can see the DoubleTime strap on a Yacht Timer with a 38mm space grey Apple Sport Watch with black buckle and lugs. Also shown is a World Timer with a 44mm stainless steel Apple Watch and silver buckles and lugs.

Double Time Back View from The Gadgets Page

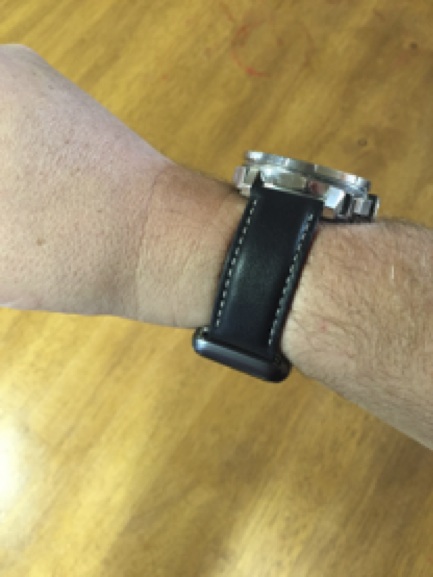
The DoubleTime strap puts your classic watch right where you’ve always had it in the normal wristwatch position, where you can check the time in a meeting without having to wake it up, and where people will notice your style. It puts your Apple Watch level with the flat bottom of your wrist.

All of the activity monitoring, pulse, and other health monitoring features work perfectly, and it wakes up when you rotate your wrist to look at it just as you’d expect. Better yet, your notifications remain private. In meetings with my hands on the table, nobody else could see my watch wake up and display notifications.

Double Time Watch Band Mechanical Face

Available in many sizes, The DoubleTime strap places both watches perfectly on the wrist for maximum comfort and ease of use. And there’s no need to worry about scratches: Apple Watches are incredibly hard. In six months of nearly constant testing, including using it while typing on an aluminum laptop, my aluminum and gorilla glass Apple Watch Sport has never acquired a blemish. The Watch and Watch Edition models are both even harder than that.

Double Time Watch Band Apple Face

The DoubleTime is subtle. In six months of prototyping and public testing, the only time people noticed the Apple Watch was when I deliberately pointed it out or they caught me taking a notification on it. At no time did it appear to be too showy. A black Apple Watch is nearly invisible with the black strap.

Double Time Watch Band Side View

The DoubleTime Strap is built with the traditional look and style of a classic leather watchband, and comes with lugs to instantly attach your Apple Watch. You can switch your Apple Watch amongst any number of DoubleTime straps so you can wear it with your entire watch collection, and you can swap the original Apple Watch bands right back on when you want to wear the Apple Watch alone.

The DoubleTime strap is especially discreet when worn with the smaller (38mm) space grey aluminum or black stainless Apple Watches, but it works perfectly well with the 42mm Apple Watch as well. The straps come with smaller 38mm lugs which match the 38mm watches and keep the strap centered in the larger 42mm Apple watches. Lugs are available in black, grey, and silver.

The DoubleTime strap is no more expensive than Apple’s straps. Our Kickstarter is coming soon, and the DoubleTime will be priced at $50 each for those in the Kickstarter campaign. After the campaign completes, the DoubleTime strap will be available from www.doubletimestrap.com for $80 each.

Sizing the Double time for perfect is complicated because the center strap has to match the size of the wrist and both watches. To size it correctly, the website asks you for your wrist circumference, Apple Watch size, and the distance between the lugs on your top-watch. The site will then determine exactly which strap segments you need and ship them.

For questions about the DoubleTime strap, please email info@doubletimestrap.com.

October 25, 2015

CARSON Universal Smartphone Optics Adapter

Filed under: Cameras — Matthew Strebe @ 8:58 am

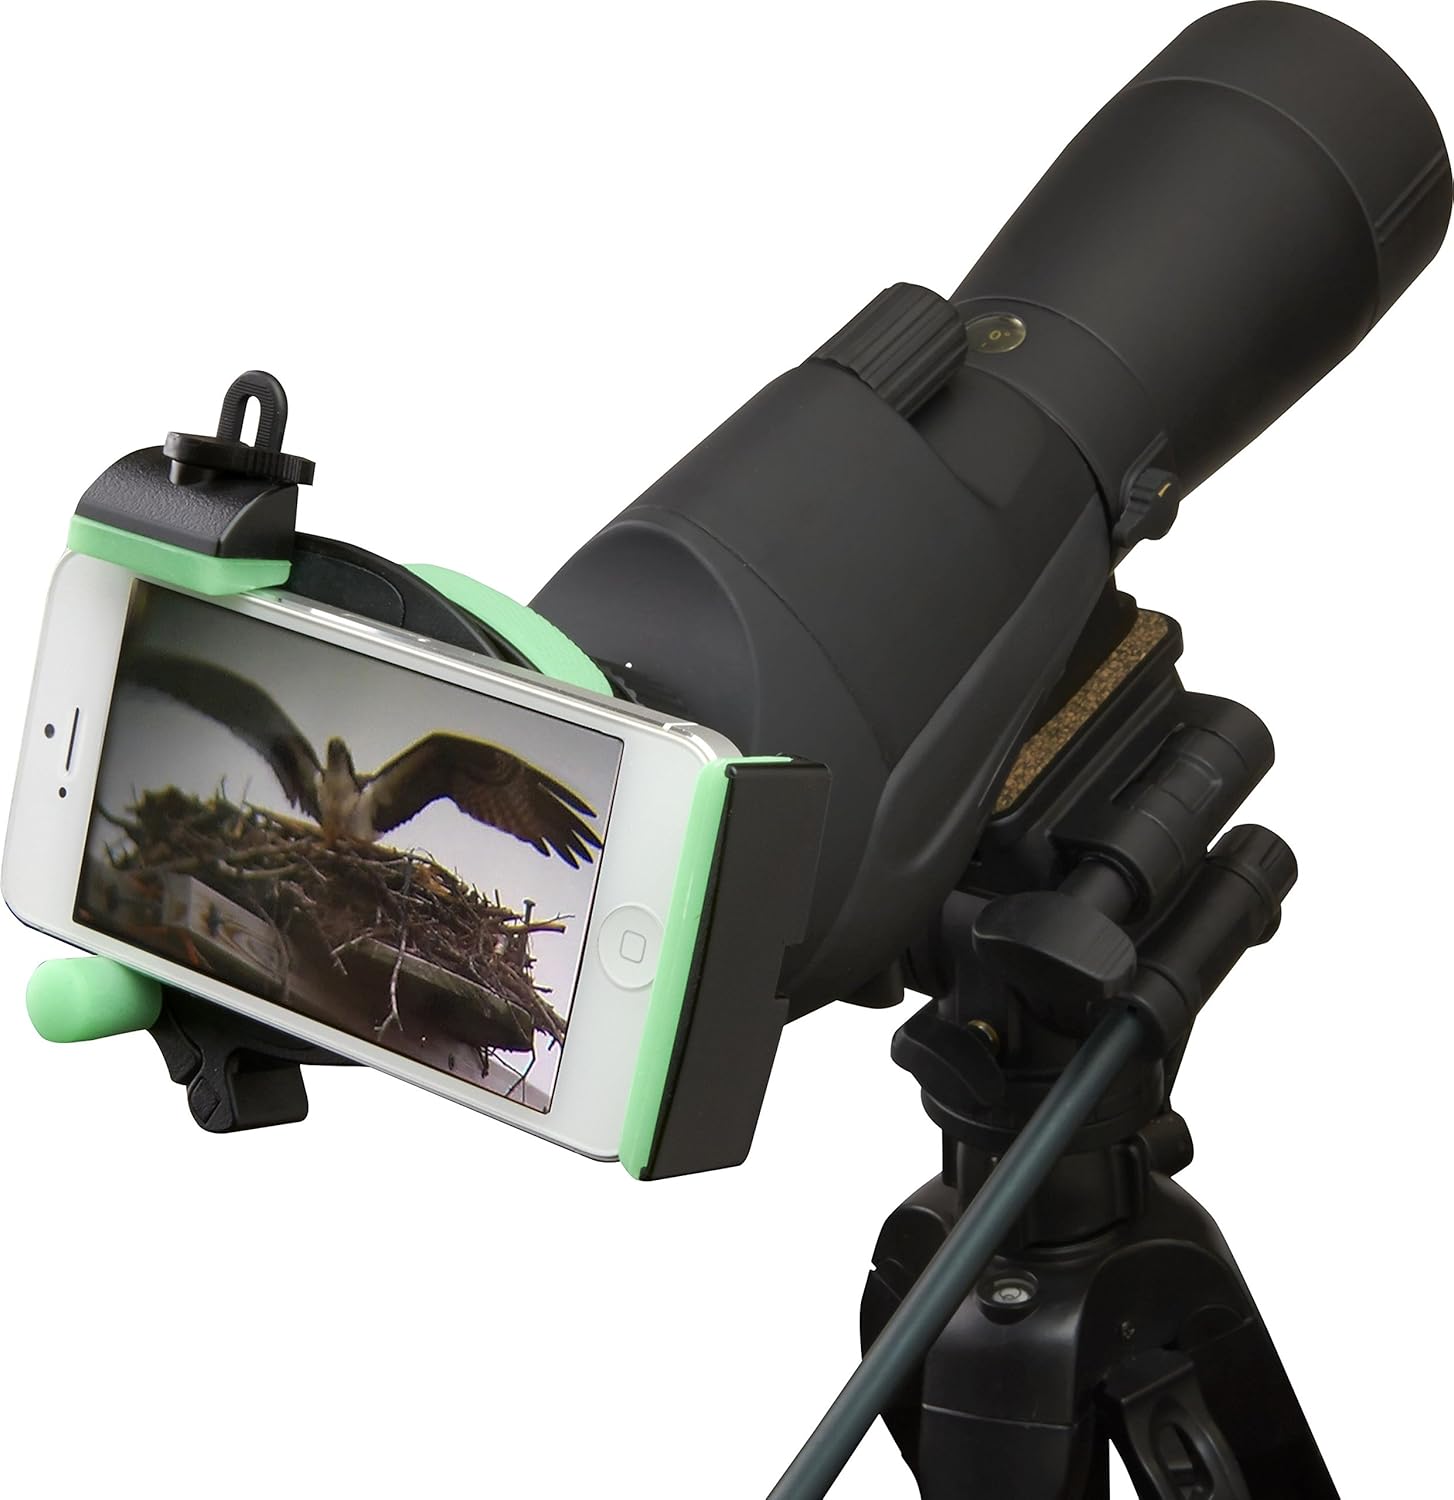
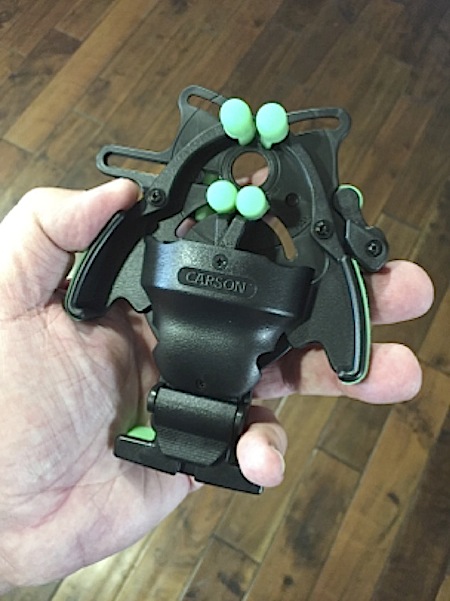
Carson HookUpz Universal Smart Phone Optics Digiscoping Adapter For Binoculars Spotting Scopes Monoculars Telescopes Microscopes and More (IS-100) at Amazon.comThe Carson “HookUpz” universal smartphone adapter is a clever device that adapts any smartphone camera to just about any optical device, such as binoculars, telescopes, microscopes, and spotting scopes. This allows you to add the camera you already have to the optics you already have.

CARSON Universal Smartphone Optics Adapter from The Gadgets Page

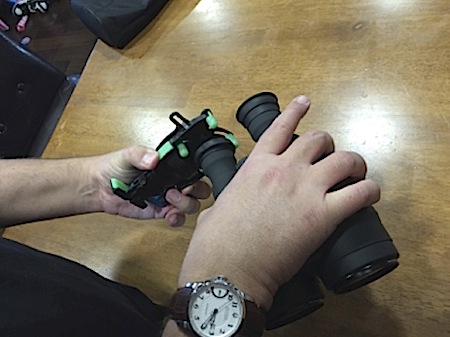
I use the the adapter with my image stabilized binoculars. This gives me an 18X telephoto lens that is image stabilized and easy to shoot through with results very similar to a DSLR.

CARSON Universal Smartphone Optics Adapter from The Gadgets Page

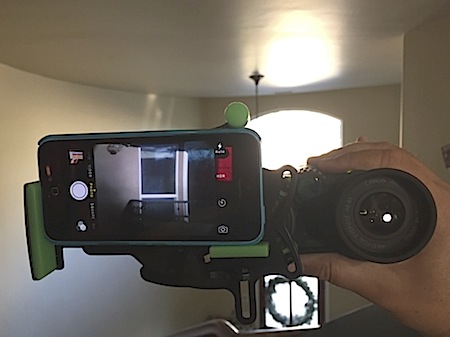
The adapter is very simple to use: Just insert your phone and line up the camera with the aperture on the adapter. Then clamp the adapter to the eyepiece of the optic. The entire setup takes less than a minute to be very precise.

CARSON Universal Smartphone Optics Adapter from The Gadgets Page

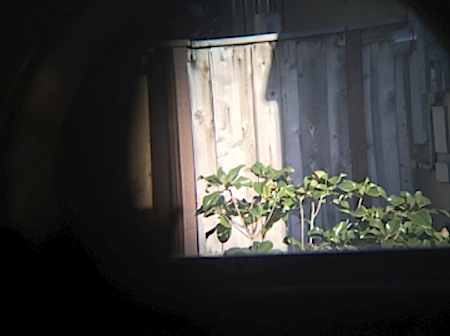
Once your phone is mounted to the optic, you can use the phone’s screen to observe through it and take pictures. The results with my binoculars were very good, and with my spotting scope the results were excellent.

CARSON Universal Smartphone Optics Adapter from The Gadgets Page

There are some physical limitations you may run into with image circle size; you may get falloff at the edges of the image because the optic image projection is smaller than your phone’s sensor. Just crop the image to eliminate this effect.

CARSON Universal Smartphone Optics Adapter from The Gadgets Page

I found the Carson Universal Optics Adapter to be reliable, clever, and well made. If you ever want to shoot through your optics with your phone, it’s the one-size-fits-all solution.

Carson’s website: http://www.carson.com/accessories/smart-phone-adapters/1468-

February 10, 2015

12 Tips for Successful 3D-Printing

Filed under: Misc. Gadgets — Matthew Strebe @ 7:14 am

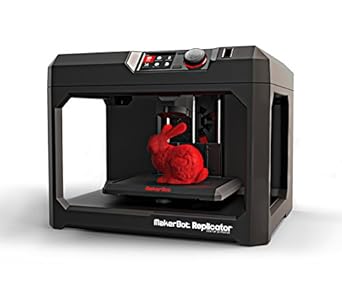
MakerBot Replicator Desktop 3D Printer at Amazon.comSo you bought a fused form filament (FFF) 3D printer such as a FlashForge or a MakerBot, and your first print turned out great!

But it’s just gone down hill from there, right? Here’s what went wrong and how to get back on track with great prints.

  • A dirty nozzle attracts filament clinging, which ruins prints. Clean your nozzle with acetone if it has accumulated gunk. Learn how to remove your nozzle and clean it by soaking it in acetone (nail polish remover) to remove old printing filament. Use an appropriately sized drill bit (usually 0.4mm) with your fingers to clear the nozzle if necessary.

  • Any dirt, moisture, or oil (such as fingerprints) on the build bed surface will prevent first layer adhesion, which will ruin your prints. Cover the build bed in an even layer of blue painter tape for an absolutely clean surface every time—but don’t touch the tape! In fact, tear off the first foot or so and discard it, because the outside of the roll has collected dirt, moisture, and oils just sitting around. When you apply the tape, touch only the left and right edges, and overlap the build board so you only have clean tape for the build.

  • Print in ABS. ABS has by far the best viscosity and flow characteristics for 3D printing, and low to no smell. PLA is the next best bet. All other plastics, including HIPS, Polystyrene, PVA, and blends are experimental and for those who know how to disassemble and reassemble their extruders only.

  • Use a heated build-bed. If you don’t have one, get one; most 3D printers have them or have an option.

  • Use an enclosed printer. Not only is it safer and quieter, but also keeps the entire chamber warm and prevents drafts from cooling your model unevenly, which can cause curling and warping. Don’t have an enclosure? Print under a clear plastic box.

  • Level your build bed every time. For ABS, the correct nozzle-to-bed thickness is .2mm, the thickness of a piece of regular printer paper. Adjust your printer’s nozzle to bed thickness by putting the paper on the bed moving the nozzle to at least three different points, and adjusting the bed height until they paper can move with resistance between the bed and the paper.

  • Print only one object at a time, in the center of your bed. While your printing software will allow you to build multiple objects at once, it doesn’t save you any time and it dramatically increases the probability that when something goes wrong, it will go very wrong. Printing one object at a time keeps you involved and watching the printer. Heated beds are also cooler towards the edges, making adhesion in those areas trickier.

  • Save large, complex, overnight builds for when you are an expert. These builds have a lot of opportunity for problems, and if they happen while you aren’t around, you could wind up with a clogged nozzle and a difficult extruder repair. Wait until you’ve got 3D printing down pat before you do your 3D print of Rome.

  • Be ready to pluck off any extrusion from the nozzle just before your print. A “snot nosed” extruder at the beginning of a build can drag around plastic and ruin what would have been a great build. As the extruder heats up, it may extrude a little plastic. Be ready to pluck that away with some tweezers before the print starts.

  • Take your printed part off the bed right after its done printing, or reheat the build bed to remove them. It’s much easier to remove a warm item. If you damage the painter’s tape at all while removing an object, take it off, wipe the bed surface with a paper-towel and acetone to clean it, and then re-apply painter’s tape.

  • Configure your printing software to print a “fence” around the first few layers of the print. The fence provides early warning of any adhesion problems and insulates the warm air around the nozzle to keep the first few layers viscous and more likely to adhere. You may also want to look into printing rafts or “mouse-ears” on corners to help them adhere, but I’ve never found that necessary—fences work well and aren’t connected to the object so they don’t require finishing.

  • Watch the first ten layers of your build directly and stop the build if there are any adhesion, curl, movement, or nozzle extrusion problems. These problems will not correct themselves; they’ll accumulate until you clog a nozzle-requiring repair. Once the first ten layers are down correctly and look good, the rest of the print is highly likely to succeed.

The difference between a good printout and something you have to throw away are these few details. When you pay attention to these few details, you can guarantee a good printout every time.

December 26, 2011

Low Light Photography with a DSLR

Filed under: Cameras — Matthew Strebe @ 10:00 am

I’ve always hated flashes. I don’t like them flashing in my eyes, I don’t like the washed out look they give to photos, the unnatural light, or the sight of dozens of them flashing at events.

I came to photography as a hobby through Astronomy—Star gazing with telescopes. Astrophotography, the art of taking pictures of planets and nebula using telescopes as camera lenses, is the ultimate form of low-light photography. In this extreme form of low-light photography, cameras are modified to remove on-chip infrared filters, they’re cooled with exotic chillers to reduce thermal noise (heat inside the camera from its own electronics), and computerized mounts rotate the camera and telescope so the shutter can remain open for hours while the world turns underneath the sky.

That’s all much harder than taking low-light photographs. Having knowledge of astrophotography methods has made it really easy for me to avoid using a flash in photography, so I thought I’d share some tips on how to do it well.

Low light photography is more complicated than point-and-shoot. You have to learn and practice it to get decent results, and doing a good job requires a DSLR. I use (and love) the Canon Rebel T2i, but any modern DSLR will do the job.

Taking low light pictures means setting the camera up to absorb more light for a particular photograph than it would during the day. There are three low light parameters you will set on your camera to accomplishing this: Aperture, Shutter speed, and ISO sensitivity. Each of them comes at a cost so finding the right balance for a particular setting is the skill you will learn over time. The information in this article will tell you exactly how to get close to good “point and shoot” settings that usually work to get you started in low light.

  • Use a fast lens (f/2 or below) on its widest possible aperture setting.
  • Use your highest acceptable ISO setting.
  • Set your camera to Aperture priority.
  • Stabilize your camera.
  • Focus manually using Live Preview and a point source of light.
  • Shoot in RAW format.
  • Use Exposure Bracketing.

The practice is simple: Make your camera as sensitive as you can get good result, open your lens to its widest possible aperture, and then control the shutter speed to get the light level you want to use. You will almost always need a tripod to prevent camera movement while the shutter is open, and you will need to select subjects that are not moving relative to the camera. Shoot in RAW format, and use auto-exposure bracketing to take multiple shots with different exposures in rapid succession to be sure you get the right shot every time.

If you don’t already know how to accomplish these settings, get your manual out and refer to it as you read through these steps.

Use a fast lens on its widest possible aperture setting

Aperture is the size of the lens opening. Because it is measured as a ratio between the focal length and the size of the lens, lower numbers mean a wider opening. f/ratio of a lens is typically between 1.2 and 5.6. Wider openings let in more light “faster”, so “fast” lenses have low numbers. The fastest commercially available lenses have f/ratios of 1.2 and they are extremely expensive. Typical lenses start at f/ratios of 4.0, and a lens is officially “slow” beyond f/5.6.

For low light you need a fast lens—f/2.8 or below, preferably much lower. I use and recommend Canon’s 50mm f/1.8 lens that costs just $100. It has junky build quality, it’s noisy, and it lacks image stabilization, but the optics are fantastic and its 1/5th the price of any other lens this fast.

I’ve not found a zoom lens that performs well in low light. Even the best zooms don’t get below f/2.8. Look to a prime 50mm or 85mm for night portraiture, and a 28mm for night landscapes or large subjects like buildings.

Use your highest acceptable ISO setting

ISO refers to the imaging chip’s sensitivity to light. The higher the number, the more-light sensitive the chip becomes, and the more noise you will see in your picture. My camera goes up to ISO 6400, but 1600 is the practical maximum for a good-looking photo. Likely yours will be similar. Set ISO to your practical maximum, which you can determine by eye after taking the same shot at each different ISO and blowing it up to the size you intend to look at it. If you can’t tell that there’s additional noise, keep going to a higher ISO until you can, then go back to the previous ISO level. This doesn’t really change much from session to session, so once you know your camera’s best acceptable ISO level, you can just set it and forget it going forward.

I don’t recommend using Auto ISO in low light situations. The camera usually prefers lower ISO levels and longer shutter times, which tends to result in blur for any motion. With a decent DSLR, you’re better off increasing the ISO to reduce shutter time in most cases. Canon cameras have the lowest inherent noise of all DSLRs and astrophotographers prefer them for this reason, but all modern DSLRs are reasonably good.

Set your camera to Aperture Priority

Aperture priority tells the camera to fix the aperture at the setting you indicate and then vary the shutter to achieve the correct exposure. Essentially, it “locks” the aperture and varies the time to achieve good exposure. Set your camera to Aperture priority and then open the aperture to its widest setting.

Stabilize your camera

If the camera moves while the shutter is open, the entire image will be blurry and appear to be out of focus. This never looks good. When you take low light photographs, the shutter remains open much longer in order to capture enough light to record an image. Any movement that occurs while the shutter is open will cause blur in the photograph. If your subject is moving, that’s unavoidable and you will get blur. This can be artistic, and in any case, there’s little you can do about it. But there’s no reason to allow your camera to move.

Many lenses include image stabilization, but the fast prime lenses that you will need for low light photography get expensive fast. Its far less expensive to use a non-stabilized lens on a tripod than to pay for image stabilization that won’t work well enough anyway. Hand-held photography rarely works well in low light conditions. You can solve this problem by mounting the camera on a tripod or monopod to eliminate shake.

Another trick I learned from astrophotography is to use a remote to fire the camera, even if you’re standing right next to it. Just the force of a person pushing the shutter button moves the camera. You can really improve your low-light photos by not touching the camera at all when you shoot. On my roof deck (where I shoot astrophotography) I can’t even walk around without causing camera shake that affects the image, so be aware of your floor surface as well.

Focus manually using Live Preview

It is very difficult for camera Auto Focus systems to perform well in low light—they hunt a lot and take a long time to confirm focus. It is also difficult for a human to focus manually through the viewfinder in low light, for the same reason: It’s hart to tell when you’re in focus with low light.

There are three simple tricks to focusing in low light: focus manually, shorten the depth-of-field, and use point sources of light to focus on.

Fast aperture settings shorten the depth of field and put most of the picture out of focus excepting the subject. Having a short depth-of-field makes focus more critical but also easier to spot because subjects will go in and out of focus quickly. If you’ve selected your lens’s fastest setting then you’ve also set the shortest depth-of-field.

The other way to make it easy is to use your camera’s Live View image on the LCD. This gives you a light-amplified image that is much larger to work from.

Try to pick point-sources of light such as lights or reflections on or next to your subject to focus on—when they are dots, you are in focus on that dot. When they are larger circles, you are out-of-focus. If your subject is a person, have them hold a tiny LED flashlight for you to focus on, which they can turn off before you shoot.

Shoot RAW format

If you are doing important low light work, use RAW mode. RAW creates very large, uncompressed images. The JPEG compression method used to condense the data that composes a photograph can create some very noticeable effects in low-light situations, such as halos around lights and dark “jaggies”. JPEG was optimized for broad color changes and can over-compress very similar areas as dark areas tend to be. Shooting in RAW format avoids this. If you can’t or don’t want to use RAW, use the largest and smoothest JPEG compression setting.

Use exposure bracketing

Exposure bracketing refers to taking multiple pictures of the same subject in rapid succession at exposures both above and below the standard exposure you’ve set. Essentially, the camera takes a darker, faster photo below your exposure setting, a photo with your exposure setting, and then a brighter, slower photo above it, all in a single button push or hold (depending on your camera). I recommend using 1 stop below and one stop above for your brackets—more than that seems to be well outside what I’d ever use.

Exposure bracketing does two things: Firstly, your eye sees light differently than the camera, and so you may not have a great idea which exposure setting is going to get you results similar to what you’re eye is seeing. Exposure bracketing takes the guess work out of it and gets a range of exposures, one of which is nearly certain to be what you’re looking for. Secondly, exposure bracketing creates the three exposures necessary to perform High Dynamic Range image manipulation with Adobe Photoshop, which is a complex topic beyond the realm of this article.
November 14, 2011

C-Loop Camera Strap Review

Filed under: Cameras,Reviews — Matthew Strebe @ 10:43 am

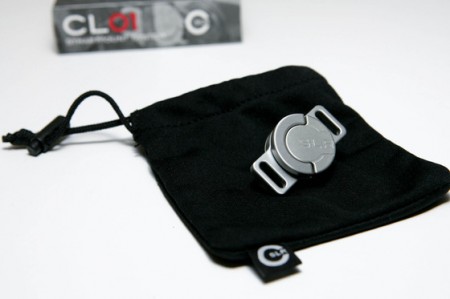
C-Loop Camera Strap at Amazon.comI hate camera straps. But I love my camera and frankly its got to be strapped to me if I’m going to use it, and so like everyone else I just lived with the fact that the strap constantly gets twisted, chaffs the back of my neck, and that the camera hangs from it at an awkward angle any time there’s a heavier zoom lens on it.

I had already given up on efforts to find “a better way” to deal with the camera strap when Custom SLR sent me one of their clever C-Loops.

The C-Loop is an ingenious little device—essentially it’s two camera strap loops on a standard mount screw that attaches to the tripod mount on the bottom of your camera. Because the loops swivel round the thumbscrew easily, the strap doesn’t become twisted.
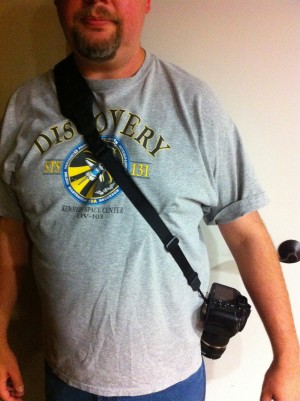
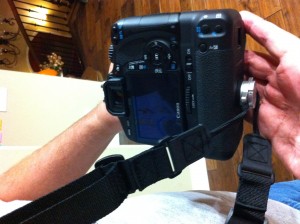
When using the C-Loop, the camera hangs now from the bottom of the camera, so lenses always point down—the way I think cameras should hang. You can easily take the strap off the camera by simply unscrewing it, which makes packing the camera away much easier and allows me to avoid having the strap hanging off the camera when its on a tripod or attached to my telescope.

But the best thing about the C-Loop is that it makes it possible to use an adjustable camera strap to carry the camera over the shoulder messenger bag style—pointing down as it should, conveniently out of the way, and not chaffing my neck. For this reason alone I think the C-Loop is a keeper.

The C-Loop is a little bit awkward with the portrait extended battery adapter because the center of gravity is higher, causing the camera to carry upside-down. This will likely be the case on professional full-frame cameras that have a built-in portrait mode as well, and is something you should consider before buying a C-Loop. It doesn’t bother me, but you might not like it.

If camera straps bug you, the C-Loop is a simple solution! More photos after the break: (Continue Reading…)

June 15, 2011

Geotagging for your non-GPS camera

Filed under: PDAs and Phones,Software — Matthew Strebe @ 1:54 pm

If you’ve got a DSLR or a point-n-shoot camera that does not do geotagging automatically, and you have an iPhone, then you need to know about two apps in the iTunes store that will turn your iPhone into a Geotagging gadget for your photos.

Geotagging is a simple concept: Photos are stored with the location where they were taken. It gives you the ability to map out your trips after the fact, remember where you were, and upload your photos to Google Earth and other cloud services so that other people can see what you saw everywhere around the world. Of course you want to be careful not to Geotag photos around your house and then upload them to online services like facebook because it will reveal where you live. This is why I don’t necessarily like cameras that automatically Geotag all photos.

I’ve used two Geottagging apps for the iPhone:

Both are good and differ only in the method they use to transfer geotagging information from the phone to your computer. With both, you go through these simple steps:

  • Sync your camera’s time to your phone time
  • Create a “trip” (shooting session)
  • Let the app run in the background while you take pictures all day
  • Export your GPS logging data
  • Run the app’s desktop Geotagging application
  • Import your photos into iPhoto, Picassa, or whatever tool you use to manage photos.

The only difference between the two is the way they export data from the iPhone app:

With GeotagPhoto, you export your trips up to their website, and their Java-based desktop app downloads that info to tag your photos. This requires an active network connection when you import, but it’s simple and it works well. You have to go through a one-time “pairing” of your iPhone app to your computer via an emailed link. Of course there will come a day with this service stops working, and then the app won’t work. GeotagPhoto is $3.99.

With gps4cam, when you export it generates a QR (2D) barcode containing all your GPS data on your phone screen, and you take a photo of the screen on the same memory card. When you run the import app, it scans all your photos and finds the QR codes from amongst them, extracts the GPS log data, and then updates the photos that aren’t QR codes. Extremely clever, equally easy, and no network connection required. The only issue I found with it is my zoom telephoto has to be about 5′ away from my phone to achieve focus on the QR code (so I change the lens first).

These two apps are amazing examples of how smartphones and apps are replacing various gadgets that you would either go without or spend hundreds of dollars on.

October 18, 2010

Parrot AR.Drone iPhone Controlled RC Quadcopter

Filed under: Toys and Games — Matthew Strebe @ 12:05 pm

AR.DroneThe AR.Drone is a completely new type of flying toy enabled by the capabilities of smartphones. Using the iPhone (or iPad or iPod Touch) as a controller, the AR.Drone receives tilt control and commands from the iPhone’s sensors and sends video back from its two onboard cameras.

The result is a totally new type of experience: Augmented Reality First-Person Flying. When you get good at it, it’s just like playing a flying game, except that you’re really controlling an actual flying machine and the video you see on screen is what you’d experience if you were onboard the machine piloting it.

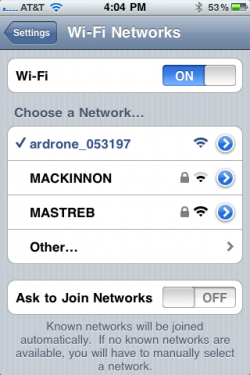
AR.Drone iPhone AppBefore you can use your AR.Drone, you have to download the AR.Freeflight app from the Apple App store. Once you’ve got it, you power up the AR.Drone, go to settings on the iPhone, and set your WiFi base station to the drone’s SSID. This creates a high-bandwidth wireless connection directly between your phone and the AR.Drone. Launching the AR.Freeflight app provides a videogame-like view through the Drone’s front camera with virtual thumb-pad style controls on the screen, which you will use to control the AR.Drone.
Here is video of our first flight:

Using the iPhone to control the AR.Drone is simple. When you first launch the AR.Drone, you will naturally control it from this third person frame of reference, by watching the quadcopter and matching movements using the iPhone’s tilt feature. The AR.Drone tilts as you tilt your phone, providing instant controllability that’s easy to understand so long as the iPhone’s orientation matches that of the AR.Drone. Because the tilt mechanism is so simple, literally anyone can fly the copter out of the box with about a minute’s worth of practice. It’s immediately accessible and great fun right out of the box.

In addition to tilt control for move forward, move backward, move left, and move right movement, there’s a soft thumb pad for controlling altitude (up and down) and orientation (turn left, turn right). Up and down is simple, but rotating the quad-copter is where things get tricky: When rotated, the iPhone’s tilt orientation no longer matches the quadcopter: If you rotate 180 degrees, controls are opposite. tilting left moves right, and tiling forward moves back. It’s difficult to map this in your mind while watching the quadcopter in third person.

Now, if you just want to fly around without watching through the camera, you never have to rotate the quadcopter—you can tilt in all directions and move anywhere you want precisely without ever rotating the quadcopter. Rotation is used when you want to change the point of view of the camera because you’re piloting by looking through the camera in first person perspective, rather than looking at the quadcopter in third person perspective. It’s a paradigm shift in control that takes a while to get used but gives you something to skill up at, which is what makes the quadcopter so much more fun than a typical RC device.

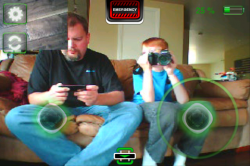
Watch yourself with the AR.Drone camerasFirst Person flying occurs when you look at video from the camera on the iPhone, ignore the actual helicopter, and fly first person from the camera’s point of view. As soon as you do that, the tilt controls make sense again in your mind, as if you’re onboard the machine. First Person flying takes more skill, and leaves a lot of room for learning. At first you’ll find yourself jumping right back out to look at the quadcopter and confuse yourself about the orientation, but once you learn to trust what you’re looking at on screen and you’ve found the control setting options you like, you’ll be flying around as if you’re a miniature pilot onboard the AR.Drone. It is quite amazing.
Onboard sensors and a powerful ARM9 microprocessor (in the same family as the iPhone processor) stabilize the quadcopter and perform the automatic flying functions so you don’t have to think about hovering and the machine never goes “haywire” if you lose control of it. If for any reason you can’t figure out why it’s doing what it’s doing (usually due to mismatched rotation), you just stop touching your phone and the quadcopter will halt and stabilize in mid air. If it hits anything causing any rotor to slow, it will shutdown immediately and drop to the ground. You can also hit an emergency soft-button to drop it at any time. Otherwise, there’s a soft-landing button that will set down gently on its own.

One of the sensors is an ultrasonic altimeter that the quadcopter uses to control its height over the floor. Flying over objects like boxes or couches will cause the quadcopter to hop up because it’s tracking a specific height over the ground for stability.

With the indoor hull on, the copter is quite safe. All the rotors are enclosed, and they’re not really capable of seriously injuring a person even when exposed unless they perhaps somehow hit an eyeball directly. They will sting if they hit you while rotating however, so fly with the indoor hull on until you’re an excellent pilot. I deliberately stuck my finger in the rotating fans, and while it smarted for a few minutes, it didn’t break the skin (or the rotor).

Downside #1: $300. It’s pretty expensive for a toy. Totally worth it, but still pretty expensive. Considering the fact that you will get addicted, you will buy extra batteries, and you will buy repair parts, and you’re looking at easily spending $500 on it in the first few months. Again, totally worth it, but expensive.

Downside #2: Battery life vs. charge time. My charge time is 70 minutes, and my run time is 17 minutes. That’s 3x+ more time to charge than to play. This means you’ll need at least three batteries and at least two chargers if you want to fly without waiting.

Downside #3: Repairs. You will damage and eventually break the AR.Drone. The upside is that Parrot sells literally every piece of the device as a repair part and the parts are not particularly expensive. The repairs appear to be rather simple. During my initial flying, I ran the quadcopter into a chair and one of the rotors took a raisin-sized chunk of Styrofoam out of the hull. A dab of glue and it was as good as new. But you should expect to spend money keeping it repaired, pretty much as you would with any vehicle.

Here is a video of a crash and fall:

I totally love the AR.Drone. It’s both a toy and a videogame, with the best features of both. It’s the most fun I’ve had with a pure toy ever, bar none, and I put it amongst the top ten gadgets ever, alongside the iPhone, iPad, Legos, Atari computers, and other gadget greats in my life.

The GadgetsPage purchased this AR.Drone retail for this review. Two more videos after the break: (Continue Reading…)

July 15, 2010

When To Go To LED Lighting

Filed under: Misc. Gadgets — Matthew Strebe @ 7:16 am

EvoLux S 13 Watt LED Medium Base Long Light Bulb, Warm White at Amazon.comLED replacement bulbs are the most efficient bulbs on the market. A 13 Watt LED light bulb generates as much light as a 100-Watt conventional bulb. I’ve been testing various LED replacement bulbs and really like the EvoLux 13 Watt Warm White lights from Smarthome.com. They replace any medium sized light bulb and come in both short (for recessed lighting) and long (for lamps) lengths.

LED replacement bulbs are expensive, retailing for about $60 compared to the $2 cost of a typical light bulb. But LED bulbs last 50 times as long as conventional bulbs, and they use 1/8th the power. These two factors can lower the lifetime cost of an LED bulb dramatically.

Whether or not LED bulbs make sense for you depends on where you live. In San Diego, where I live, I pay 28¢/KWh for the majority of my power. This means that a typical light bulb costs me $30 per year to operate, whereas an LED bulb costs just $4. I’ll also have to replace that incandescent bulb each year based on normal lifetimes, so in ten years I’ll have paid $320 to operate a normal bulb, but just $100 to operate an LED bulb. That’s less than 1/3rd the price overall. Over the 50 year lifetime of the LED bulb, it’s 1/5th the price.

However, if you pay 10¢/KWh for power, you’ll never actually recoup the cost of an LED light bulb at $60.

For me, it’s already time to make the switch to LEDs. Your rule of thumb is simple: When LED bulbs cost twice in dollars what you pay for a KW of electricity in cents, it’s time to make the switch. For example, if you pay 15¢ for electricity, LED bulbs make sense at $30 retail.

The current generation of LED lights are not dimmable, and their light is quite directional, so they are best used in recessed ceiling lights rather than in lamps. Also, most LED bulbs cast a cold white glow that people often find to be harsh, so if you like the warm yellow glow of incandescent, make sure you order warm white bulbs with a color temperature below 3500K. Finally, you’ll have to remember to take your LED light bulbs with you when you move, or you’ll lose their cost effectiveness.

In the end, LED lighting has a initial investment that may seem daunting, but can be well worth the investment, depending on your electricity bills. With a little research, you may find a way to save yourself money AND save the planet.

June 3, 2010

The Case For Automating Your Windows

Filed under: Green Gadgets,Misc. Gadgets — Matthew Strebe @ 1:04 pm

We pay for a lot of power at the highest billing rate in Southern California because we have eight people living in a 5000 square foot home. When we moved in, our average summer time power bill exceeded $700 per month. Cooling the house with A/C was ridiculously expensive, and it put me on a quest to reduce power usage dramatically. I wish I could say I wanted to save the environment, but it was the money that motivated me.

So I looked at my options and came up with two potential solutions to the massive power bills: Solar, and on-site natural gas cogeneration. Either would be big, expensive projects, so in the mean time, we just ran around the house and opened the windows whenever it got hot, leaving the A/C off.

With my roof and location, I can get up to 3.5Kw of solar power generation installed for about $20K. Going through the numbers, it looks like I’ll reduce my power bill by about $220/mo. on average.

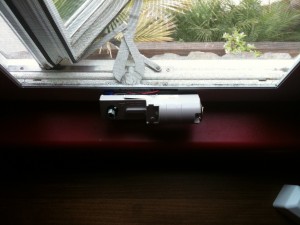
Automated WindowsAs we tired of the daily window opening and closing, I setup a simple home automation system to automate the problem. I put motors on the crank-style casement windows and used a $300 home automation controller to setup simple rules, such as “Open the windows if it’s cool outside and hot inside.” The whole setup cost less than $2000 and took me about three days to get running, most of which consisted of fishing wires through the walls to the window motors.

Then I looked into on-site natural gas cogeneration. Natural gas energy is much cheaper than electricity in California, but unfortunately cogeneration wasn’t feasible with a generator. While possible technically, the generators wear out every year. They’re noisy, and it’s not clear that they’re legal. On cost grounds, by my analysis, it would be twice as expensive as paying for power due to the short generator lifetime. I looked at fuel cells as well: Highly efficient, silent, and long-lived, but also very expensive. The payout would be fifty or so years, longer than the unit’s lifetime.

When I revisited the power bill after automating the windows, I discovered that this simple, interim solution had reduced our power bill by over $300 per month! The house was comfortable all the time, and the A/C hadn’t come on since I got the system running. A $2000 investment in home automation equipment would be paid back in just seven months, and was reducing more utility bill costs than a $20,000 solar system would.

The system automatically opens and closes the windows based on the home’s interior temperature compared to the weather outside. I have a simple program that runs on a $300 embedded controller computer (a Universal Devices ISY-99) that monitors the inside temperature, an RSS feed of the weather station where I live, time-of-day, and likelihood of rain, and makes decisions about whether and when to open or close the windows.

This setup saves me, on average, $320/mo. compared to the months when we first moved in and left the windows shut and the A/C and heat on a 68/74 degree thermostatic setting. Those months we were averaging over $740/mo. for power, and now we’re averaging $360.

Before you spend a lot of money on generating electricity, do everything you can to reduce your electrical use. Big wins for us included eliminating AC with natural ventilation and ceiling fans, replacing CRT and plasma televisions with LCD, replacing old appliances with new more efficient models, cold-water laundry, and line-drying clothes. We now have our power consumption down by two-thirds over-all, and have reached a point where adding solar may take us down to zero.

I used Truth casement window operators and controllers from wintrol.com, and INSTEON I/O Linc modules, and an ISY-99 home automation controller from smarthome.com to implement this project.

April 19, 2010

Apple’s Keyboard for the iPad Shines

Filed under: eBook Readers and Peripherals — Matthew Strebe @ 11:01 am

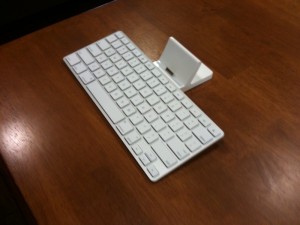
Apple iPad KeyboardI ordered the iPad keyboard when I bought my iPad, and it arrived today. The keyboard is amazingly heavy; it’s carved from a single block of aluminum and seems to weigh about five pounds. It holds the iPad firmly, and is just barely heavy enough to stay put when you pull the iPad out. It would be awkward for carrying around. If you want a portable option, a wireless bluetooth keyboard is your best option to take a keyboard with you on the road.

The keyboard itself is basically Apple’s keyboard with a few extra buttons where the function keys would be:

  • Home
  • Search
  • Dim
  • Bright
  • Photos
  • Onscreen keyboard
  • A blank key that does nothing (!)
  • Rewind
  • Play/Pause
  • Forward
  • Mute
  • Volume Down
  • Volume Up
  • Lock

The iconography is quite obvious. Otherwise it’s a typical Mac keyboard, option key and all. One difference is that Alt-delete is not interpreted as backspace–this is a key I miss. Might be a good use for that blank key if the right set were shifted left so it could be placed above delete. The key feel is superb, just like a Mac keyboard, and I can type on it as fast as any keyboard I’ve ever used. I really wish there was an additional dock connector on the long bottom axis so the iPad could be used in landscape mode. I check my email in landscape mode, and I tend to do all of my “producing” work in that mode. I wrote this review in Pages with the keyboard, and I’m quite impressed that the iPad and this keyboard could actually replace a desktop for light users.

The keyboard makes the iPad far more useful when not wandering around, and will allow it to replace a laptop for many users. I consider it to be a mandatory buy for iPad owners.

Next Page »

Powered by WordPress
(c) 2003-2017 Michael Moncur, Laura Moncur, Matthew Strebe, and The Gadgets Page