The Gadgets Page

January 15, 2009

Acer Aspire Vs. Apple MacBook

Filed under: Computers and Peripherals — Laura Moncur @ 5:00 am

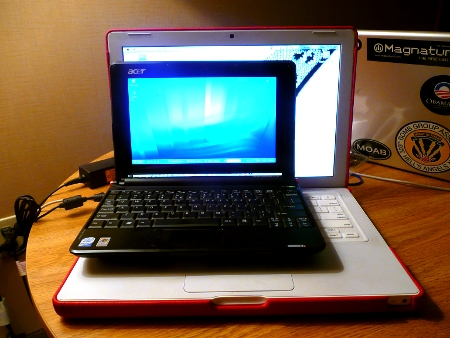
For the last two years, I have used my Apple MacBook for travel and home computing. It has been a great computer, but with the introduction of the netbooks, I wanted a sleeker machine to travel with. Last week, while I was in Las Vegas covering CES, I took a detour to the Las Vegas Fry’s Electronics and purchased an Acer Aspire One. Here is a photo of it compared to my MacBook.

Acer Aspire One Vs. Apple MacBook

When the MacWorld announcements were so disappointing, I realized that Apple is never going to make me a netbook. They are too in love with their full sized keyboards and 13 inch screens. Sorry, Apple, but THIN isn’t necessarily SMALL. The Acer Aspire One can fit in my purse. The MacBook Air cannot.

I don’t mind Windows, and honestly, I’ve had some difficult problems with the Mac OS that just DIDN’T work. Going back to a Windows machine is merely a training of my hands to use Ctrl+C and Ctrl+V instead of Command+C and Command+V. Other than that, there is little difference. That’s why it was so easy for me to switch from Windows to Mac. It’s just as easy to switch from Mac to Windows, especially on a travel computer.

Plus, I want to try out all the cool Linux stuff that Ubuntu offers. With the Acer Aspire, I was able to create a USB boot drive following these instructions:

It was easy to follow the instructions and I was able to do it without too much help from Mike. I haven’t been able to get my wireless to work yet, but it’s fun to play with a new operating system and I like the idea of running a computer with open source software.

In the end, I felt frustrated waiting for Apple to deign to give me a netbook computer. I wanted a small computer that I could take traveling and to coffee shops. As many times as Mike said that my MacBook was “small enough,” seeing it next to the Aspire is a shocking reminder that it’s possible to upgrade by downgrading in size.

Update 12-08-10:

It has been nearly two years since I wrote this entry. In the end, the Acer Aspire is in Kristen’s room, relegated to kid’s computer status. I’m STILL using that MacBook as my heavy duty travel computer, but more often than not, I don’t even bring that and just use my iPad wherever I go. While even the newest MacBook Air STILL doesn’t fit in my purse, the iPad does.

Apple DID make me a portable computer that lets me blog, write, read books, watch videos and play games on the go. I guess I should have been patient and saved myself the money I spent on the Acer…

January 14, 2009

CES From Above

Filed under: Misc. Gadgets — Laura Moncur @ 5:00 am

When things were just getting set up at CES last week, I snapped a couple of photos. I like how this one turned out.

Click to see full size: CES 01-07-08 by Laura Moncur

We’ll be writing about our favorite highlights from the Consumer Electronics Show over the next few days. Stay tuned for the newest in electronic gadgets!

January 13, 2009

The MacBook Wheel

Filed under: Computers and Peripherals — Laura Moncur @ 5:00 am

Sometimes The Onion makes videos that are too close to reality. This parody shows an imaginary Apple product called the MacBook Wheel:


Apple Introduces Revolutionary New Laptop With No Keyboard

For $2599, all you get is a screen and a round click wheel. Sounds like a deal, right? I love the quote from the Apple User:

I’ll buy almost anything if it’s shiny and made by Apple.

After watching last week’s lackluster footage from MacWorld, this parody from The Onion hits too close to home.

Via: Apple’s “Other” Announcement at Macworld | 2009 MacWorld, Apple, funny | geeksugar – Technology, Gadgets, & How Tos.

January 12, 2009

Review: StarTech USB Graphic Dock

Filed under: Computers and Peripherals,Reviews — Matthew Strebe @ 5:00 am

StarTech.com USB to VGA 4-in-1 Docking Station at Amazon.comI’ve always been skeptical of USB docking stations because USB technology is too slow for video. USB 2 is less than half the bandwidth of a gigabit network adapter, and its speed has to be shared amongst all connected devices. It’s more than fast enough for keyboards, mice, and even network adapters, but video is another matter entirely—video needs a lot of speed.

But I’ve also got a new netbook that desperately needs a docking station, and netbooks don’t come with or support docking stations. And most netbooks only have USB ports, so there’s no option: It’s either a USB docking station or none at all.

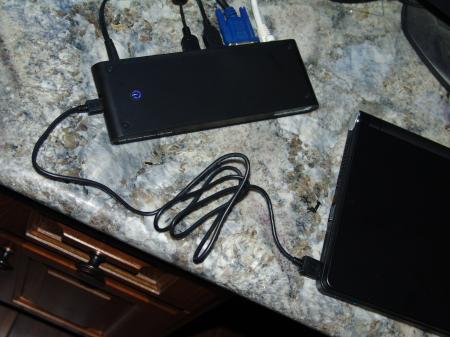
StarTech USB Graphic Dock

So with some trepidation I hooked up the StarTech USB 2 Graphic Docking Station and gave it a spin. Installation was simple after copying the drivers to a USB flash drive (because my netbook has no CD-ROM reader)—just run the setup program, tell it to continue three or four times for driver install, reboot as indicated, and plug the dock in. Each of the devices came up in turn: A USB 4-port hub, network adapter, audio adapter, and VGA adapter. My monitor woke up and displayed the blue background of my desktop, and a new tray icon appeared that allowed me to set the monitor to be the primary display. With no trouble at all, I was up on my external keyboard, mouse, display, and wired network connection.

Knowing that bandwidth would be an issue, I immediately set out to test the performance of the dock. I set the resolution to my monitor’s maximum of 1600x1200x32 bits, and started browsing the web. To my surprise, the video was quite usable—yes, dragging windows was choppy, and occassionally the mouse cursor would flicker, but overall there were no usability issues. Annoying motion banner ads were just as annoying as usual, and web flash video ran without any significant degradation. I was surprised by that. So far, so good.

So I hit it with a real test: Netflix streaming video. This would surey tax the USB port because the inbound network data and the outbound video and audio would be going over a single USB connection. Sure enough, it did. Full motion video ran at about two frames per second, which was completely unusable. I was able to get the framerate up by switching to the internal wireless adapter and disabling the dock’s wired network adapter and by moving audio back to the laptop’s internal sound card, but never to the point where it would be consdidered even remotely acceptable. But then, I knew that would be the case.

What really surprised me was how useful the dock was for everything but streaming video and gaming—any typical office task, web, and email will be just fine with this dock—that’s pretty much what Netbooks are good for anyway. If you’ve got a laptop that lacks a dock, and you’re not using it to watch movies or shoot aliens, the StarTech USB 2 Graphic Docking Station will do the job for you with no hassle whatsoever. When you do need to watch video or shoot aliens, just undock it and use the laptop’s own devices.


Disclosure: StarTech was nice enough to send us a docking station for this review.

January 9, 2009

Review: Kodak Easy Share Wireless Picture Frame

Filed under: Misc. Gadgets,Reviews — Matthew Strebe @ 5:00 am

Kodak EasyShare W1020 10-Inch Wireless Digital Frame at Amazon.comI purchased the Kodak Easy Share Wireless Picture Frame with a specific purpose in mind: I wanted to immediately transfer motion sensor triggered photos from my Panasonic network camera at my front door onto a screen up stairs so we could see who was at the door before going downstairs to answer it. Advertised as “being able to receive emails with photo attachments and immediately display them”, it seemed that the Kodak picture frame might be just the ticket, since the camera can immediately send email photos when it senses motion.

I purchased the frame at Best Buy for $219–$50 lower than it’s MSRP of $269. Although its frame is made of plastic. The screen is okay but not great—it’s about middle of the road as LCD displays go. It has a wide angle viewability side to side, but is polarized vertically and so changes colors quickly when you angle it from top to bottom. That’s probably the right choice to make, and for the money I’m not going to dwell on the screen quality—it’s more than adequate. Unfortunately, the electronics protrude about ½” behind the frame, making it unsuitable for directly hanging on the wall. I’m not sure why digital photo frame makers think that it’s okay for the frame to protrude 1” away from the wall—you’d have to cut a large square hole in your wall in order for this frame to sit flush. It’s most appropriately used on a desk.

Kodak EasyShare W1020 10-Inch Wireless Digital Frame at Amazon.comThe frame was pretty easy to setup: Upon power-up, you use the touch-sensitive frame area below and to the right side of the display to move a cursor around and set the WiFi password. After restarting, it was up on my network and displaying default photographs.

Using the frame is trivially simple: Just pop in a photo card from your camera, and the photographs will instantly start showing using default settings. You control the frame using the touch sensors, using a swipe motion to scroll through photos and a touch motion to call up the menu. The menus are very easy to use, allowing you to select photo shows from the card, from online sources, and to set some of the frame’s defaults.

The frame is compatible with three different online services: Flickr, FrameChannel, and Kodak Easy Share online. FrameChannel and the Kodak site are so similar that it’s surprising that they both exist, much less are both supported. FrameChannel does provide an interesting additional service: Ambient information channels such as weather predictions, stock info, and news that appear automatically on the frame. You can’t change the settings for the online services on the frame directly, but you can point your computer’s web browser at the frame’s IP address to call up a website that will allow you to configure it completely.

In the frame’s configuration website, you can establish RSS Photo feed settings for the three directly supported services or for any generic RSS Photo feed site. The setup does require you to have accounts on these services, and it is a little bit of work to figure out exactly how everything should be setup, but I figured it out easily and without cracking the manual.

Of the three services, the Flickr integration is best: You can simply select Flickr on the menu and pretty much instantly your Flickr Photostream will appear as a slide show. You can setup tags to filter photos by as separate slide shows and choose between them, and you can even setup menu items to match tag channels on the main display.

The ability of the frame to map to an arbitrary Photo RSS feed means that you can use it as an ambient information display. For example, if you want to keep track of specific stocks, airline flight information, or network status information you could create a software application that generates those graphs and uses Photo RSS to feed them to the display.

A little hacking on my part showed that the frame complies with the Universal Plug and Play (UPnP) standard for a media browser and a media renderer. This means that future home theater devices will be able to run slideshows directly on the frame, and that other frames can connect to it to display its content. The Kodak software uses UPnP features to control the frame, but UPnP itself is immature and there’s very little third party support for these features at this time.

Unfortunately, the love ended pretty early for this frame. Without fail, the wireless frame detached from my wifi-network after about two hours and stopped displaying anything, refusing to reconnect to the network until it was disconnected from power and restarted. It always reconnected immediately, which indicates that the problem is with the frame, not with the network (none of my other wireless devices have this problem). This problem makes it impossible for me to recommend this wireless frame until a firmware update that correctly addresses reconnecting to the network automatically is available.

Kodak EasyShare W1020 10-Inch Wireless Digital Frame at Amazon.comThe Kodak Easy Share software is utter garbage, doing little more than pointing you back to the frame’s own website in a window. The only reason to install it is to copy photos to the frame directly from your computer, but that’s more easily handled by copying them to a memory card in my opinion. There’s little to no point in installing it at all—the saving grace is that you don’t need it at all. I’m not sure why manufacturers go through all the effort of including poorly written software that is just going to annoy people when it isn’t even remotely necessary.

As for my use case—receiving photos from my network camera automatically and displaying them immediately—the frame is unfortunately not suitable. The first problem is that you can’t actually email photos into the frame. It does not check an email account for photos. Rather, you can configure FrameChannel or Flickr to receive email, and the frame will pull those photos down eventually. The best time I could get was about five minutes from the photos being sent until they arrived on the frame. Also, even if I could get photos onto the frame immediately, there’s no way to get the frame to instantly change to the latest newly arrived photo—rather, it gets to it eventually as it cycles through the slide show.

To make me happy, this frame would need to be configurable to check at email account using an email protocol for new photo mail when I touch the touch-sensor—not just RSS Photo feeds (none of which can be controlled closely enough to show what I want on the frame). It would also be nice if the frame supported common file transfer standards such as FTP, which would allow network cameras to transfer photos to it with no intervening servers and no need for the photos to go out on the Internet. It would also be nice if the frame could be configured to automatically display the most recently downloaded photos.

Kodak EasyShare M1020 10-Inch Digital Frame at Amazon.comAll of these would be forgivable if the wireless connectivity was reliable, but it isn’t. And given that, you’re better off just using its non-networked sibling, the Kodak M1020, which is half the price. A quick look on-line indicates that I’m not the only one having this problem, so I’ll be returning mine to Best Buy.

January 8, 2009

Review: ZAGG Z.buds iPhone Earbuds

Filed under: Audio and Video,Reviews — Thom Allen @ 5:00 am

ZAGG Z.bud EarbudsToday I’m reviewing a product from ZAGG called Z.buds. The product is positioned as an iPhone ear bud replacement, but can be used with any listening device that has a 3.5mm jack.

The first thing I noticed about this product, when I was finally able to remove it from the bullet proof packaging, was the nylon wrap around the wires. At first I didn’t think I was going to like that because it felt strange, but it has definite advantages. For one, the nylon material actually aids in keeping the wires from getting tangled up. Second, it should prevent nicks in the wire as they are used.

There are three adjustable silver beads that can be used to tighten or loosen the cords leading to your ears. I find this to be a winner because when you wear ear buds during physical activity, the split wires get tangled an buds usually fall out. The beads also add some style to the black and silver color scheme.

The ear pieces themselves sit in your ear hole, they don’t hang from your ear like the Apple ear buds. The package also includes 5 different bud covers, two clear rubber sizes, two foam sizes, and a cover that looks like a pawn from a chess game. Having this many options is great. I tried them all, and found the small clear cover to work best for my ear.

One thing you have to get used to with buds that fit in your ear, rather than just hanging, is the tight fit it creates. You really can’t hear much around you once you get the Z.buds fitting correctly in your ear. This adds to the over all listening pleasure. It helps keep all the ambient or passive noise out, and you just hear whats playing on your device. This is fantastic when your in a crowded room or on a noise bus.

The Z.buds also include inline volume control, a very nice feature which I use a lot. The Z.buds also have an inline microphone for use as a hands free headset for your iPhone. I tried the headset with my iPhone and it worked as expected. I also noted that the microphone piece works like the Apple ear buds that come with the iPhone, where the button on the mic will advance music when listening to iTunes. I’m not sure, but I suspect it would work the same on other brands. There is also a small nylon loop in the middle of the cord, presumably for connecting to a shirt or jacket button? I couldn’t find any specific use, but I guess you can be creative.

The only real problem I had, was the inline mic seemed heavy, and kept pulling the ear piece out. I had to move the tightening beads further up to even out the weight.

Overall I found the ZAGG Z.buds to be a very well made, very usable product. The sound was as good as any other headset or ear bud system I’ve reviewed. I tend to max out the volume so I can see how the speakers handle various music types. While the Z.buds performed well with all types of music, I did notice that at times the bass seemed muffled at lower volume settings. Turning up the volume helped, but you can’t always listen at higher levels.

If you are looking for a well priced, well performing ear bud, I don’t think you can wrong with the ZAGG Z.buds.

January 7, 2009

Loud N Clear

Filed under: Misc. Gadgets — Laura Moncur @ 5:00 am

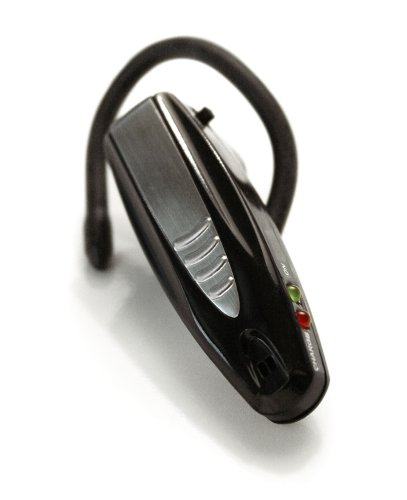
Loud N Clear at Amazon.comI don’t know why it has taken so long for someone to invent Loud N Clear, but I’m glad it’s finally here. For those people who are embarrassed by their hearing loss and don’t want to admit to the world that they need hearing aids, this little gadget looks like a bluetooth headset, but instead of making your phone easier to hear, it helps you hear everything better.

I personally haven’t tried this gadget, but I heartily approve of it. A couple of years ago, Mike and I were talking about bluetooth headsets and how common they are. I mentioned that it would be totally cool if they would make hearing aids that looked like bluetooth headsets so that people could hear clearly, but look like a normal headset-wearing person.

Of course, this commercial makes it look silly…

I wish that an established hearing aid company would make something like this, but for now, Loud N Clear will have to do.

January 6, 2009

We Are So Proud Of Our RCA Spectra 70

Filed under: Computers and Peripherals,Retro Gadgets — Laura Moncur @ 5:00 am

Update 01-15-15

The incredible Mike Dodas recognized the computer and the people in the photos! He identified some of them and told us the whole story about them here:

Thank you, Mike, for sharing all this information with us! I love hearing about the old systems and I believe all of it should be saved and archived. Wishing you the best in all you do!


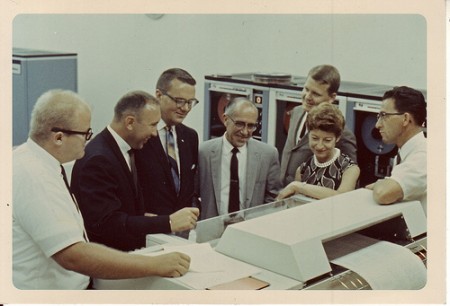
I found these photos in a local antique store in Salt Lake City and I knew that I HAD to have them. It’s obvious that these people are so proud of their RCA Spectra 70.

RCA Spectra 70 UT Department of Employment Security Edna Smith from The Gadgets Page

Here is a little more information on this particular computer.

The RCA Spectra 70 was a line of electronic data processing (EDP) equipment manufactured by the Radio Corporation of America’s computer division beginning in April 1965. The Spectra 70 line included several CPU models, various configurations of core memory, mass-storage devices, terminal equipment, and a variety of specialized interface equipment.

The system architecture and instruction-set were largely compatible with the non-privileged instruction-set of the IBM System/360. While this degree of compatibility made some interchange of programs and data possible, differences in the operating system software precluded transparent movement of programs between the two systems.

Michael found these PDFs of the RCA Spectra70 Brochures:

If you notice, the 1965 brochure doesn’t mention a Salt Lake City office, but the 1968 brochure does. Considering that RCA stopped selling the Spectra70 in 1970, I suspect these photos are from the opening of the Salt Lake City office. There were few companies in Utah who would be so proud of their computer back then: Evans and Sutherland or maybe the U of U.

More photos after the break: (Continue Reading…)

January 5, 2009

Animal Crossing: You’ve Caught A Mole Cricket!!

Filed under: Animal Crossing,Toys and Games — Laura Moncur @ 5:00 am

Animal Crossing: City Folk at Amazon.comI’ve been playing Animal Crossing: City Folk pretty regularly. I’m not as obsessed with it as I was Animal Crossing: Wild World, but that’s mostly because I have to play it on the Wii instead of the DS. The whole house can hear me when I play Animal Crossing: City Folk and the town is 52 inches wide. When Mike can see my obsession in HD greatness, I’m a little less willing to play for hours on end. The DS was a more private way to obsess.

Since it’s winter in the game, there aren’t very many bugs to catch, but one of the bugs that I can still get are mole crickets. Imagine my shock and surprise when The Bloggess showed me a photo of a REAL mole cricket.

What the hell is this? by jennythebloggess from Flickr

If I saw that thing running around, there’s NO WAY I’d catch it! Butterfly net or not! After reading her comments, they are harmless:

dewde says:

LOL it’s a mole-cricket. Pick it up and it will try and “dig” into your hand much like a puppy digs in the dirt. It tickles, actually.

In the game, when you hear the mole cricket, you have to get out your shovel, dig a hole and then hurry and get your butterfly net to catch the cricket scurrying away. When I’m playing Animal Crossing, mole crickets look so cute. In real life, not so much. I think I’ll stick with the fantasy for now.

January 2, 2009

Five Ways To Fix A Stuck Pixel On Your Screen

Filed under: Computers and Peripherals,Watches — Laura Moncur @ 5:00 am

JScreenFixI have a Nintendo DS with one pixel that just doesn’t work the way it should. It looks like a white dot (sometimes it changes color, but ALWAYS the wrong one) on my screen. It’s just irritating on games like Animal Crossing, but for more time sensitive games, sometimes it’s a killer. It became so irritating, that I eventually just got a new DS.

I found this awesome entry by Tina at MakeUseOf.com about how to fix a stuck pixel on your computer screen. If I had known about this, I might have been able to fix my Nintendo.

Most of the software that she recommends is for Windows machines, but there are a couple of techniques to use if you have a Mac. It’s called JScreenFix and it’s a website you can visit.

There’s even one that might work if it’s a different machine (like my Nintendo DS or a Sony PSP). Before you take that Mac back to the Genius Bar, try these techniques to see if you can reset your pixel on your own.

Via: HijiNKS Ensue – Geek Webcomic – Updates Monday, Wednesday and Friday » Archive » Catching Up

« Previous PageNext Page »

Powered by WordPress
(c) 2003-2017 Michael Moncur, Laura Moncur, Matthew Strebe, and The Gadgets Page