The Gadgets Page

December 26, 2011

Low Light Photography with a DSLR

Filed under: Cameras — Matthew Strebe @ 10:00 am

I’ve always hated flashes. I don’t like them flashing in my eyes, I don’t like the washed out look they give to photos, the unnatural light, or the sight of dozens of them flashing at events.

I came to photography as a hobby through Astronomy—Star gazing with telescopes. Astrophotography, the art of taking pictures of planets and nebula using telescopes as camera lenses, is the ultimate form of low-light photography. In this extreme form of low-light photography, cameras are modified to remove on-chip infrared filters, they’re cooled with exotic chillers to reduce thermal noise (heat inside the camera from its own electronics), and computerized mounts rotate the camera and telescope so the shutter can remain open for hours while the world turns underneath the sky.

That’s all much harder than taking low-light photographs. Having knowledge of astrophotography methods has made it really easy for me to avoid using a flash in photography, so I thought I’d share some tips on how to do it well.

Low light photography is more complicated than point-and-shoot. You have to learn and practice it to get decent results, and doing a good job requires a DSLR. I use (and love) the Canon Rebel T2i, but any modern DSLR will do the job.

Taking low light pictures means setting the camera up to absorb more light for a particular photograph than it would during the day. There are three low light parameters you will set on your camera to accomplishing this: Aperture, Shutter speed, and ISO sensitivity. Each of them comes at a cost so finding the right balance for a particular setting is the skill you will learn over time. The information in this article will tell you exactly how to get close to good “point and shoot” settings that usually work to get you started in low light.

  • Use a fast lens (f/2 or below) on its widest possible aperture setting.
  • Use your highest acceptable ISO setting.
  • Set your camera to Aperture priority.
  • Stabilize your camera.
  • Focus manually using Live Preview and a point source of light.
  • Shoot in RAW format.
  • Use Exposure Bracketing.

The practice is simple: Make your camera as sensitive as you can get good result, open your lens to its widest possible aperture, and then control the shutter speed to get the light level you want to use. You will almost always need a tripod to prevent camera movement while the shutter is open, and you will need to select subjects that are not moving relative to the camera. Shoot in RAW format, and use auto-exposure bracketing to take multiple shots with different exposures in rapid succession to be sure you get the right shot every time.

If you don’t already know how to accomplish these settings, get your manual out and refer to it as you read through these steps.

Use a fast lens on its widest possible aperture setting

Aperture is the size of the lens opening. Because it is measured as a ratio between the focal length and the size of the lens, lower numbers mean a wider opening. f/ratio of a lens is typically between 1.2 and 5.6. Wider openings let in more light “faster”, so “fast” lenses have low numbers. The fastest commercially available lenses have f/ratios of 1.2 and they are extremely expensive. Typical lenses start at f/ratios of 4.0, and a lens is officially “slow” beyond f/5.6.

For low light you need a fast lens—f/2.8 or below, preferably much lower. I use and recommend Canon’s 50mm f/1.8 lens that costs just $100. It has junky build quality, it’s noisy, and it lacks image stabilization, but the optics are fantastic and its 1/5th the price of any other lens this fast.

I’ve not found a zoom lens that performs well in low light. Even the best zooms don’t get below f/2.8. Look to a prime 50mm or 85mm for night portraiture, and a 28mm for night landscapes or large subjects like buildings.

Use your highest acceptable ISO setting

ISO refers to the imaging chip’s sensitivity to light. The higher the number, the more-light sensitive the chip becomes, and the more noise you will see in your picture. My camera goes up to ISO 6400, but 1600 is the practical maximum for a good-looking photo. Likely yours will be similar. Set ISO to your practical maximum, which you can determine by eye after taking the same shot at each different ISO and blowing it up to the size you intend to look at it. If you can’t tell that there’s additional noise, keep going to a higher ISO until you can, then go back to the previous ISO level. This doesn’t really change much from session to session, so once you know your camera’s best acceptable ISO level, you can just set it and forget it going forward.

I don’t recommend using Auto ISO in low light situations. The camera usually prefers lower ISO levels and longer shutter times, which tends to result in blur for any motion. With a decent DSLR, you’re better off increasing the ISO to reduce shutter time in most cases. Canon cameras have the lowest inherent noise of all DSLRs and astrophotographers prefer them for this reason, but all modern DSLRs are reasonably good.

Set your camera to Aperture Priority

Aperture priority tells the camera to fix the aperture at the setting you indicate and then vary the shutter to achieve the correct exposure. Essentially, it “locks” the aperture and varies the time to achieve good exposure. Set your camera to Aperture priority and then open the aperture to its widest setting.

Stabilize your camera

If the camera moves while the shutter is open, the entire image will be blurry and appear to be out of focus. This never looks good. When you take low light photographs, the shutter remains open much longer in order to capture enough light to record an image. Any movement that occurs while the shutter is open will cause blur in the photograph. If your subject is moving, that’s unavoidable and you will get blur. This can be artistic, and in any case, there’s little you can do about it. But there’s no reason to allow your camera to move.

Many lenses include image stabilization, but the fast prime lenses that you will need for low light photography get expensive fast. Its far less expensive to use a non-stabilized lens on a tripod than to pay for image stabilization that won’t work well enough anyway. Hand-held photography rarely works well in low light conditions. You can solve this problem by mounting the camera on a tripod or monopod to eliminate shake.

Another trick I learned from astrophotography is to use a remote to fire the camera, even if you’re standing right next to it. Just the force of a person pushing the shutter button moves the camera. You can really improve your low-light photos by not touching the camera at all when you shoot. On my roof deck (where I shoot astrophotography) I can’t even walk around without causing camera shake that affects the image, so be aware of your floor surface as well.

Focus manually using Live Preview

It is very difficult for camera Auto Focus systems to perform well in low light—they hunt a lot and take a long time to confirm focus. It is also difficult for a human to focus manually through the viewfinder in low light, for the same reason: It’s hart to tell when you’re in focus with low light.

There are three simple tricks to focusing in low light: focus manually, shorten the depth-of-field, and use point sources of light to focus on.

Fast aperture settings shorten the depth of field and put most of the picture out of focus excepting the subject. Having a short depth-of-field makes focus more critical but also easier to spot because subjects will go in and out of focus quickly. If you’ve selected your lens’s fastest setting then you’ve also set the shortest depth-of-field.

The other way to make it easy is to use your camera’s Live View image on the LCD. This gives you a light-amplified image that is much larger to work from.

Try to pick point-sources of light such as lights or reflections on or next to your subject to focus on—when they are dots, you are in focus on that dot. When they are larger circles, you are out-of-focus. If your subject is a person, have them hold a tiny LED flashlight for you to focus on, which they can turn off before you shoot.

Shoot RAW format

If you are doing important low light work, use RAW mode. RAW creates very large, uncompressed images. The JPEG compression method used to condense the data that composes a photograph can create some very noticeable effects in low-light situations, such as halos around lights and dark “jaggies”. JPEG was optimized for broad color changes and can over-compress very similar areas as dark areas tend to be. Shooting in RAW format avoids this. If you can’t or don’t want to use RAW, use the largest and smoothest JPEG compression setting.

Use exposure bracketing

Exposure bracketing refers to taking multiple pictures of the same subject in rapid succession at exposures both above and below the standard exposure you’ve set. Essentially, the camera takes a darker, faster photo below your exposure setting, a photo with your exposure setting, and then a brighter, slower photo above it, all in a single button push or hold (depending on your camera). I recommend using 1 stop below and one stop above for your brackets—more than that seems to be well outside what I’d ever use.

Exposure bracketing does two things: Firstly, your eye sees light differently than the camera, and so you may not have a great idea which exposure setting is going to get you results similar to what you’re eye is seeing. Exposure bracketing takes the guess work out of it and gets a range of exposures, one of which is nearly certain to be what you’re looking for. Secondly, exposure bracketing creates the three exposures necessary to perform High Dynamic Range image manipulation with Adobe Photoshop, which is a complex topic beyond the realm of this article.
December 6, 2011

Polk Audio Ultra Fit 3000 Sports Headphones

Filed under: Audio and Video,Reviews — Christy Strebe @ 11:39 am

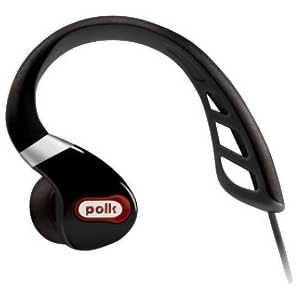
Polk Audio UltraFit 3000 Headphones at Amazon.comThe nice folks at Polk audio sent me the Polk Audio Ultra Fit 3000 Sports headphonesto review. They were such a nice surprise to arrive in my mailbox because they are AWESOME. These are the first pair of head phones I’ve used that don’t come out while I’m riding my spin bike. Usually I have to put my head phones back in three or four times. The Polk Audio Ultra Fit 3000 Sports headphones have an ear hook that looks like it would be uncomfortable to wear, but once they were in place I didn’t notice it.

The sound quality is remarkable too! The headphones come with three different cable lengths, so if I have my iPhone in an arm strap I don’t have a long cable dangling down, or I can attach the headphones to my Nano and clip it on my shirt collar.

The cables are also flat so it doesn’t get all tangled up if I just throw it in the pocket of my gym bag (they come with a nice carrying pouch where they are normally stored). I would definitely recommend these to anyone who’s headphones routinely fall out, or if you’re just looking for a great pair of sport headphones.

Review: Splash Masque Clear Screen Protectors for iPhone 4

Filed under: PDAs and Phones — Michael Moncur @ 12:58 am

As a new owner of the iPhone 4S, the first accessory I looked for was a cover for the screen. While the iPhone 4 and 4S screen isn’t exactly fragile, and has a nice fingerprint-resistant coating, I always keep my gadget screens covered. My phone spends a lot of time in pockets and tends to get scratched without it. The iPhone 4’s screen, with its retina display, looks beautiful—and the first few screen protectors I bought ruined its appearance, making everything blurry and indistinct. I peeled off and threw away several in frustration. Fortunately, I found one that works, the Splash Masque Clear Screen Protector. I’ve used it since I activated my new phone last month and it’s working perfectly.

Applying The Screen Protector

As with most screen covers, applying the Masque is a tricky process. First, clean the screen thoroughly—I use an alcohol-based cleaner. Next, rub it with a microfiber cloth (included) to remove any dust. Once the screen is spotless, peel the protective cover from one end and stick that end to one end of the phone. Carefully spread it out from there, smoothing out any bubbles. You might have to try several times, and watch for dust particles.

Here are some tips that will help when applying any screen cover:

  • Apply the cover in a humid, dust-free area. Some people use the bathroom with the shower running.
  • Use a bright light such as a desk lamp. Tiny dust particles are hard to see.
  • One last bit of dust left? Avoid the temptation to blow on it. Your breath contains moisture particles and you’ll end up starting the cleaning process over. Worse, any dust you blow into the air will stay in the air for a minute and then settle on your phone just as you make your next attempt. Use the microfiber cloth instead.

Screen Clarity and Durability

Although it’s thinner than most of the other covers I tried, making it easier to apply, the Masque isn’t fragile. Once the Masque is applied, it stays on—unlike some others, it hasn’t started to peel after a month of use.

For the iPhone 4’s beautiful display, the one feature I really needed was clarity. The Masque is the only cover I tested that didn’t compromise the detail and readability of the screen. There’s a visible moire pattern when the phone is turned off, and it’s barely visible when the screen is mostly black. Other than that, everything looks great, from movies to Kindle books.

Conclusion

The Splash Masque covers come in a 3-pack, which costs under $10. Considering that many iPhone screen covers cost $20 for a single cover, this is a great deal, and it actually works better than the expensive alternatives. As anyone with screen-covering experience knows, it might take you three tries to apply a cover smoothly, and if you luck out the first time you’ll have spares.

As a bonus, the Masque 3-pack comes with two back screen covers. (This might sound strange, but the iPhone 4’s back is made of glass and equally susceptible to scratches.) These aren’t glossy like the front cover but instead have a matte appearance and a soft brushed texture. The back cover adds a bit of much-needed friction to the slippery phone and doesn’t interfere with the phone’s use at all.

As the cheapest, best option and the only one that doesn’t compromise the iPhone 4’s screen quality, I highly recommend these covers.

November 23, 2011

Can I See It With My Hands? The Samsung Galaxy S II

Filed under: PDAs and Phones — Laura Moncur @ 9:36 am

I love this commercial! I’m that person who faithfully waited for the iPhone 4S. I am one of those people who waited in a line (a virtual online, line the very moment they were available for pre-order). This commercial makes fun of me, yet I LOVE it!

I love the snotty guy waiting in line:

Hipster: “I could never get a Samsung. I’m creative.”

Other Hipster: “Dude, you’re a barista.”

Personally, I decided against the Samsung phone because I wanted my stuff to WORK. With my iPhone, I have a little grocery list that Mike can add to and edit. With my iPhone, I have my music and playlists that easily sync to my phone. I’m sure I could get all those cool things with a Samsung phone, but I’d have to learn how to do it and go to the trouble of making it work. I’ve already done that work with my iPhone, so the thought of going to that effort again with a different ecosystem is unpleasant to me.

I could never get a Samsung. I’m too freakin’ lazy.

Apple products have the momentum to keep me for a while. Things will have to get pretty dang bad before I’m willing to move to a Samsung phone.

Via: Samsung Mocks iPhone Fans in New Galaxy S II Ad – Mac Rumors

November 21, 2011

Keep Track of Your Favorite Interests with Pinterest

Filed under: eBook Readers and Peripherals,PDAs and Phones,Social Media,Software — Christy Strebe @ 10:26 am

When I used to browse the web and find something I wanted to remember, I’d bookmark it with a description of what it was. I’m crafty, so I would do this with crafts. I also have three kids so I’d bookmark an educational site or ideas for decorating.
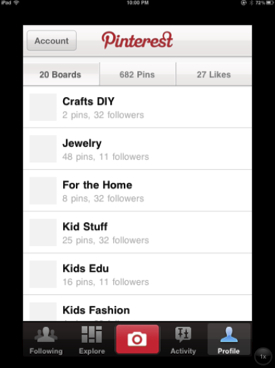
This worked great for me, until the hubby decided I needed an iPad upgrade (okay, I wanted it too). I’m not super technical and he is, so I let him do it for me. Everything went great until tried to go to a bookmark on the new iPad – everything was gone, and the bookmarks on my old computer had been wiped clean. I no longer knew where that cute headband idea was, or the great site for math games, it was all gone. I was able to remember some of the sites that had catchy names but for the most part I was back to ground zero.

I knew there had to be a better way, and stumbled upon it a few days later, when my sister-in-law was telling me about her new favorite site – Pinterest.com. This site lets you pin pictures from the web and categorize them by whatever you choose. Not only that, but you can find other people with similar tastes or friends and follow them to see what they have pinned. You can also browse Pinterest to see what has been pinned lately.
I have to warn you though – it can become addicting. To pin your own stuff, you add a “pin it” button to your toolbar. Then, if you’re on a site you want to save, click the “pin it” button and it will display all the pictures on that page. Select the picture you want to save, select a board (like a folder) and give it a description or note. Viola! It is saved into your account on Pinterest land. You can have your pins posted on Facebook if you want also.

There are different kinds of pinners, those who pin everything and do nothing and those who pin and do. I fall somewhere in the middle. So far I have made a ton of projects:

  • Bracelets and rings
  • Halloween treats
  • Beaded spiders
  • Cookie dough dip out of hummus (not recommend – and I went back and commented on my pin to that effect so my “followers” wouldn’t be led astray)
  • Jewelry holder out of an art canvas
  • Energy balls (these were good)
  • Spelling game for my kids
  • Felt flowers
  • Repurposed a t-shirt into a shrug
  • Dish washer detergent from scratch
  • 72 hour emergency kits
  • Foot scrub
  • Crafts for the kids

As you can see there is a wide variety of crafts to choose from.
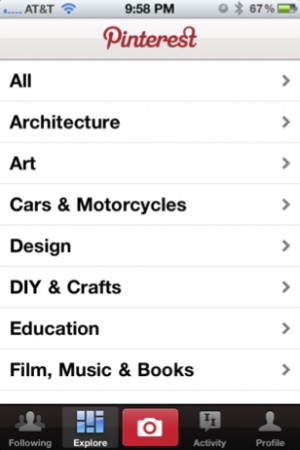
You can also pin travel ideas, books, gadgets, humor, etc. Pinterest has a list of 32 categories for you to browse, and assign your pins to, for others to browse, but you can create as many boards as you want and name them whatever you want.

Additionally, Pinterest has created an iPhone app to work with their website. You can download it here:

A few tips and tricks I’ve found:

  • The Pinterest app is a little crashy. When it starts acting strangely, restart the app, or if that doesn’t work, restart the device.
  • On Pinterest.com if you click on the pinterest logo at the top it will take you back to the home screen.
  • You can search for friends to follow by name in the search box, and everyone who has signed in with their Facebook account will have their profile pic so you can see who it is.
  • If the Pinterest web site is too much information for you, try the app. It gives you the top pins for that category and you can pin from there. Here is a picture (above right) of what the DIY & Craft board has on my phone.

So happy pinning, and I’ll see you on Pinterest.

Update 06-21-12 from Laura Moncur: I had avoided Pinterest when Christy reviewed it because it was so difficult to find the original link to the photos on their site. I’m happy to announce that they have fixed that, so I can easily see WHERE the pins came from, no matter how many times it has been repined. I’m happily pinning along with Christy now and I love it!

November 17, 2011

Technical Innovation + 12 Years = Progress

Filed under: Articles,Audio and Video,PDAs and Phones — Michael Moncur @ 6:16 pm

Today, Apple’s iTunes Match service went live. For a small yearly fee, iTunes Match allows you to keep all of your music online. Apple stores it in their iCloud servers, and you can play or download it from your computer, iPhone, or iPad. To save you the trouble of uploading your 100GB of music, Apple’s service conveniently scans your MP3s. If iCloud already has a copy of the song—quite likely given Apple’s user base—it will simply “match” the song rather than uploading it. Thus, you can have access to your entire music library from all of your devices in a very short time.

Thanks to iTunes Match, you have a backup of all of your music, instant access from anywhere, and the chance to upgrade your MP3s to a higher quality.

Sounds like progress? To me it sounds like a blast from the past.

Remembering My.MP3.Com

January 2000. Google was only a couple of years old. Facebook didn’t exist. Apple was a company that sold funny-looking computers. They wouldn’t introduce the iPod for another year. The most sophisticated smartphone looked like this.

This was when MP3.com, originally a site for musicians to share their own music, launched a feature called My.MP3.com. This was a cloud-based music service that let you stream your entire music collection from any computer. It used a matching algorithm so that you wouldn’t have to upload a track if they already had a copy. Does that sound familiar?

Unfortunately, MP3.com didn’t ask for permission from record labels. They were sued by Universal Music Group for copyright infringement, lost to the tune of $53 million, and went out of business.

What if there were no legal objections? I’m still not sure MP3.com would have succeeded. It was limited to music you bought in CD form at a store—there was no way to buy music from their site. It’s hard to scale servers to support this kind of load, and their service was limited by the technology of the time—you had to use a computer to access your music, and few people had broadband Internet access.

Progress Takes More Than Technology

This is an important lesson in how technical innovation is only a small part of progress. MP3.com had the cloud servers 12 years ago, and they had the same matching concept as iTunes Match. They even had a great domain name. But they didn’t have the industry connections to make it legal or the infrastructure to make it practically useful.

Apple introduced the iPod in 2001, along with the first version of the iTunes music store. While the iPod and later Apple products are mainly praised for their design and technical features, Apple also made amazing progress in doing all of the legal wheeling and dealing necessary to make the whole thing legitimate. It took years for iTunes to reach the point where it had licensed music from all of the major publishers, with some popular bands like the Beatles taking 10 years. Finally, after a ton of work from Steve Jobs and Apple, iTunes Match brought the same features as My.MP3.com to the real world. The service is much more useful, too, since you can play music from your phone over a 3G network.

My point here is not to complain that copyright law needs to change (which it does) or that we live in an overly litigious society (which we do). But if you’re wondering why a new feature hasn’t been released yet on your favorite gadget, or if you’re considering selling something yourself, remember that a great idea and a technical innovation always have the potential to bring progress. But if the company doesn’t deal with the legal issues and the infrastructure, It just might take 12 years to arrive… and it might be a different company that succeeds with the idea.

November 14, 2011

C-Loop Camera Strap Review

Filed under: Cameras,Reviews — Matthew Strebe @ 10:43 am

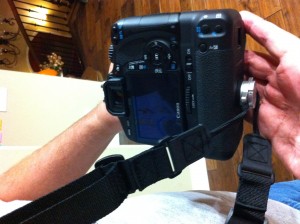
C-Loop Camera Strap at Amazon.comI hate camera straps. But I love my camera and frankly its got to be strapped to me if I’m going to use it, and so like everyone else I just lived with the fact that the strap constantly gets twisted, chaffs the back of my neck, and that the camera hangs from it at an awkward angle any time there’s a heavier zoom lens on it.

I had already given up on efforts to find “a better way” to deal with the camera strap when Custom SLR sent me one of their clever C-Loops.

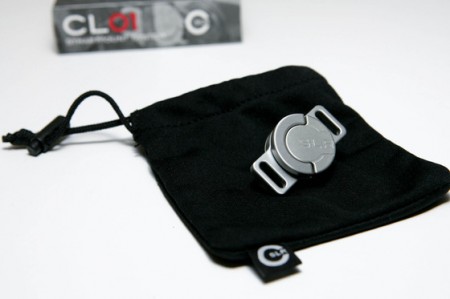
The C-Loop is an ingenious little device—essentially it’s two camera strap loops on a standard mount screw that attaches to the tripod mount on the bottom of your camera. Because the loops swivel round the thumbscrew easily, the strap doesn’t become twisted.
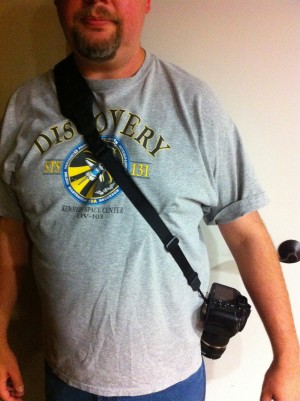
When using the C-Loop, the camera hangs now from the bottom of the camera, so lenses always point down—the way I think cameras should hang. You can easily take the strap off the camera by simply unscrewing it, which makes packing the camera away much easier and allows me to avoid having the strap hanging off the camera when its on a tripod or attached to my telescope.

But the best thing about the C-Loop is that it makes it possible to use an adjustable camera strap to carry the camera over the shoulder messenger bag style—pointing down as it should, conveniently out of the way, and not chaffing my neck. For this reason alone I think the C-Loop is a keeper.

The C-Loop is a little bit awkward with the portrait extended battery adapter because the center of gravity is higher, causing the camera to carry upside-down. This will likely be the case on professional full-frame cameras that have a built-in portrait mode as well, and is something you should consider before buying a C-Loop. It doesn’t bother me, but you might not like it.

If camera straps bug you, the C-Loop is a simple solution! More photos after the break: (Continue Reading…)

November 11, 2011

The Toyota Yaris: It’s A Car!

Filed under: Cars & Transportation — Laura Moncur @ 8:20 am

I absolutely ADORE this advertising campaign from Toyota. It’s for their Yaris, which is the bottom of the line car for them and they have decided to highlight features usually overlooked by car manufacturers.

Do you go places sometimes and leave places other times? Maybe you need a Yaris. It’s a car!

Ironically, my VW Beetle didn’t have this feature. The windows broke so often that I eventually just stopped rolling them down at all.

My Beetle wasn’t very good in this department either. It had two cup holders that couldn’t hold anything larger than a can of soda and even that was a tight squeeze.

Yellow? No! I guess I’ll just have to go with Other Other Blue…

Nine airbags! I AM PROTECTED!

Personally, I don’t care for the “soft dash” features. I have them in certain spots on my Prius and they are grime magnets. I’d rather just have plastic, I think.

It’s handy to have a USB port to plug in your iPod or iPhone. I wonder how it works with the stereo. I DO know that you can upgrade the Yaris stereo to one that has integrated Bluetooth.

They don’t even mention the best part of the Yaris. The gas mileage is 30 mpg in the city and 35 mpg on the freeway. I get 45 mpg in my Prius, but it cost me TEN THOUSAND dollars more than the Yaris. In the end, these Yaris commercials are just silly fun, but they got me to seriously look at a car that I might not have even considered.

November 9, 2011

iPad: Every Superlative

Filed under: Computers and Peripherals,eBook Readers and Peripherals — Laura Moncur @ 9:02 am

This supercut video plays every superlative used in the original iPad keynote.

It’s no wonder that by the time a keynote is over, I end up wanting whatever it is that they are showcasing. Not only do they create amazing, wonderful, beautiful, magical and awesome products, they aren’t afraid to say so.

Via: Supercut.org — Steve Jobs’ iPad keynote: Every superlative

November 3, 2011

Classic Game Review: Shadow of the Colossus

Filed under: Toys and Games — Ian @ 4:58 pm

Shadow of the Colossus at Amazon.com

I had heard of Shadow of the Colossus and decided to get it about two or three years ago. Once I started playing, it became one of my favorite games for the PlayStation 2 for many reasons.

In Shadow of the Colossus there is very little speaking because the plot is very simple, but the game is complicated in its own way. The nameless main character wants to bring a girl back to life, but to do this he must venture into forbidden land and slay all sixteen colossi. He must slay them with his ancient sword, bow, and horse. His sword is magical and can find the colossi, their weak points, and kill them.

This video is showing actual gameplay rather than just an animation like in some trailers.

The graphics are beautiful in Shadow of the Colossus. I found myself being really excited to see the next colossus. With each colossus you’ll find yourself looking for how to beat it by trying new things until you find what works. For example, when fighting the first colossus you must stab his ankle to get him to fall over so you can get to his head. With each colossus it gets more and more complicated to kill them. It is like an exciting puzzle figuring out what the next step is.

Shadow of the Colossus is one of the best games on the PlayStation 2, because of the graphics, the gameplay, and the creativity of the game. It is like nothing I have seen before. This game is one of the best.

Next Page »

Powered by WordPress
(c) 2003-2017 Michael Moncur, Laura Moncur, Matthew Strebe, and The Gadgets Page